In this blog we shall learn a string function called REPLACE. We shall use REPLACE function in Select as well as Update statements with examples to understand it better.
We shall start with a basic Select statement using Replace function to understand what it does.
In simple terms, a REPLACE function takes in a string as first parameter and then accepts a pattern as 2nd parameter, searches for that pattern in the first parameter and replaces with what is passed in the 3rd parameter.
Let us look at an example to understand better. See the below select statement with Replace function. The string value ‘Easy very easy’ is passed as first parameter, then the second parameter ‘EASY’ is passed which is the string pattern, so the Replace functions’ main objective is to find that pattern in the string passed and replace with the value ‘tough’ where ever it sees the string pattern ‘EASY’. Hence it returns ‘tough very tough’ as output. Since there are 2 occurrences of easy in the string.. (see 1st line of the output)
SELECT REPLACE('Easy very easy','EASY','tough')
Note: I ran all queries at once and captured the output, in order to post the results as a single screenshot.
In the next example, we shall see what will happen if we pass an integer values as the 2nd and (or) 3rd parameters. The REPLACE function will still return an output by converting the integer values to character or string values. (see 2nd line of the output)
SELECT REPLACE('Let us say 123',123,777)
See that 123 was not surrounded by single quotes as ‘123’, but still the function converts it to string value 123. Note, this does not mean that you pass the values without single quotes.
Next, we shall see what happens if one of the parameters is a NULL. If one of the parameters is a NULL value, the output returned will be a NULL. (see 3rd line of the output)
SELECT REPLACE('In case of nulls',NULL,'Nothing')
Finally, lets look at what happens when you pass a single space as search pattern.
SELECT REPLACE('Not NULL but Space',' ','BlankSpace')
Since the string value ‘Not NULL but Space’ has 4 single spaces, the output will be enerated by replacing those 4 single spaces with the string value ‘BlankSpace’. (see 4thd line of the output)
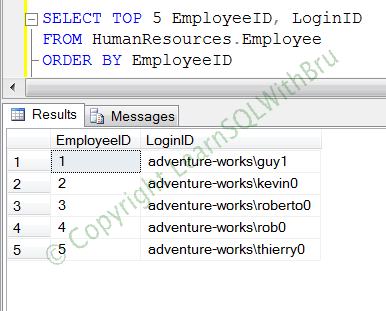
Next, let us look at how to use REPLACE function when performing an update to a table data. Before we update table data, first let us run this query to see how the data looks like.
SELECT TOP 5 EmployeeID, LoginID
FROM HumanResources.Employee
ORDER BY EmployeeID
The below is the screenshot when the above query is run..
Now, I would like to replace the value “adventure-works” with “LearnSQLWthBru” in all the rows of the table. So we use Replace function in the “set columnname = expression” in the Update statement, as shown below….
UPDATE AdventureWorks.HumanResources.Employee
SET LoginID = REPLACE(LoginID,'adventure-works','LearnSQLWithBru')
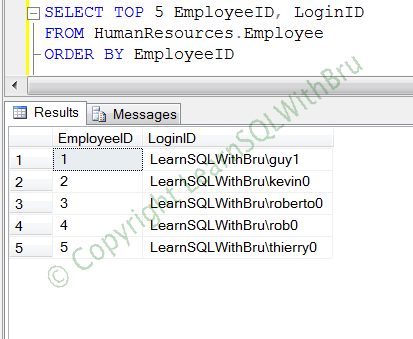
After running this query, re-run the initial select query against the table to see how the data looks after the update.. The pic displayed below is how it looks..
Suggestion: When performing an update against a table, it is a better to run a select statement and include the where clause (to be used in Update statement) to make sure you are going to update as many records as it returns in the select statement..
Do you like this site? Like our FB page @ Facebook.com\LearnSQLWithBru so that, you know when there is a new blog post.
— Bru Medishetty


