Verifying SQL Server Database Backups

We know that data in a database is important and also aware that database backups are required in case of a disaster in order to restore the database to a previous state (before the disaster). As a Database Admin it is crucial to perform regular database backups. One of the important tasks many people might not pay attention with respect to database backups is to verify whether or not the database backup is reliable. What I mean is whether that particular database backup is good to be restored?“. It would be a real disaster to have a backup which is not good to be used, in case of recovery. In order to be on a safer side, we need to verify the backups that we have taken. There are 2 ways you can verify whether or not a backup is reliable; one way would be to try restoring from the backup and the other way is to try a restore verifyonly. When a restore the database from a backup (procedure 1), you actually need to have sufficient disk space to hold the database being restored, where as using restore verifyonly option, you do not need to have the free disk space for the database. It verifies whether or not the particular database backup is reliable or not (indicating that it is possible to restore the database from that particular database).

Let’s say you stored your database backup on C: Drive as dbbackup.bak, use the following command to verify if that backup is valid.

RESTORE VERIFYONLY FROM DISK = 'C:\dbbackup.bak'

The image below shows screen shot of the scripts used in this example.

It would be a good practice to verify the backup files using this option on a regular basis.

Do you like this site? Like our FB page @ Facebook.com\LearnSQLWithBru so that, you know when there is a new blog post.

– Bru Medishetty

Choosing how the query result are displayed

When working in Query Editor of the SQL Server Management Studio, you can choose how to display the query results. There are 3 different ways to choose from and each of them has its advantage. You can choose/ switch the display format from the standard toolbar of the Management Studio by selecting the required format icon. The 3 icons to choose from are highlighted in the image below.

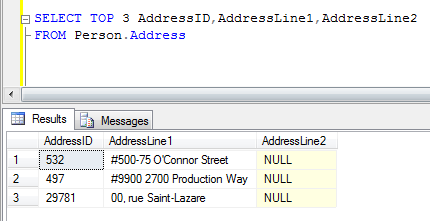
By default,  query results are displayed in Grid format. Choosing this display format is in a way more convenient than other formats since the result-set displayed is tabular format which is easy to understand, the columns can be re-sized in order to fit the screen and more importantly the entire result-set or part of it can be copy pasted to an excel sheet for more analysis or ad-hoc reporting purpose. A sample image is displayed below. To switch from other format to Grid format press Ctrl + D.

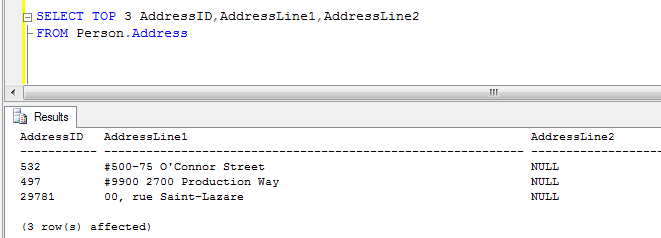
To make the results displayed in text format press Ctrl + T. Switching from one result format to other format will be effective from the next time query is executed. The below image shows the results in a text format, the downside of this format is the columns in the result-set are displayed according to their actual column width and causing a wider display of the results than desired and the columns cannot be re-sized.

To switch from other format to Grid format press Ctrl + Shift + F.

This way of having the result-set might not be a desired option for immediate viewing of the results, but this can be used when the output needs to be saved in a text format for future reference or to attach the result-set as an email attachment. When the query is executed, a dialog box is opened in order to choose the location of the file to be created. By default the files are report file with “.rpt” extension, you can choose a different extension also.

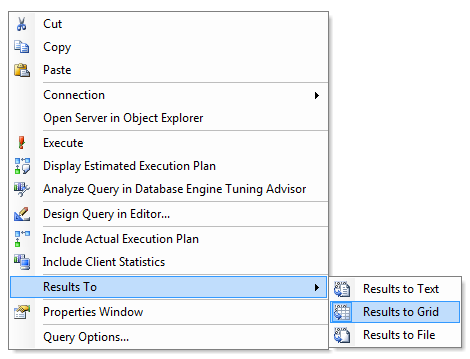
There is another way to switching / selecting the results format. Right click in the query editor, from the pop up menu, go to Results To and choose the desired format as shown in the image below.

Do you like this site? Like our FB page @ Facebook.com\LearnSQLWithBru so that, you know when there is a new blog post.

— Bru Medishetty

How to know the SQL Server Version

In order to know the SQL Server and Edition details you would be possibly looking at the SQL Server properties and find out the details. Occasionally it might be needed to check the same as part of a job / or a script, you need to query the SQL Server for this info. In order to do this you can use @@Version to retrieve the installation information of SQL Server.

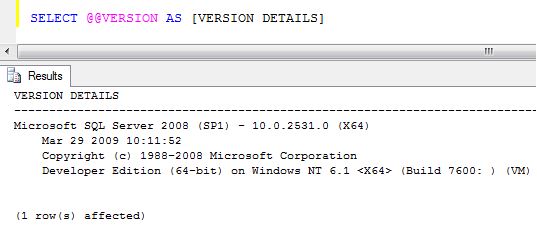
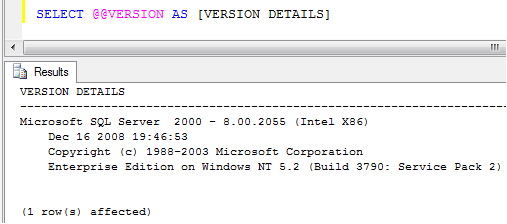
The following images displays the output from the same T-SQL command when run on different types of SQL installations.

The above result indicates the SQL Server is 2008 Developer Edition running 64-bit version of the SQL Server. Note that it displays some details about the operating system too. Here in the above case it is Windows Server 2008 and the machine is a Virtual Machine.

The above result is displayed when executed on an instance running SQL Server 2000 Enterprise Edition hosted by a Windows Server 2003. Note that it displays the Service Pack 2 for the Windows Server 2003 and the service pack information is not for the SQL Server.

It is through experience we know how to identify the Windows Server Version (2003 or 2008) by looking at the Windows NT 5.2 (for 2003) and 6.1 (for 2008) etc.

Use the following script.

SELECT @@VERSION AS [VERSION DETAILS]

Do you like this site? Like our FB page @ Facebook.com\LearnSQLWithBru so that, you know when there is a new blog post.

— Bru Medishetty