This is the first blog in a 2 part series on how to create Linked Server to connect to another SQL Server (Instance) and run queries using the created Linked Server. These 2 blogs will give you step by step instructions to create Linked Server on SQL Server 2012 using Graphical User Interface and T-SQL.
Using graphical user Interface in SSMS
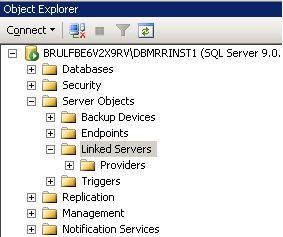
First we will look at the steps to create a Linked Server the easy way. In Object Explorer , expand the tree view of the SQL Server, expand Server Objects and Right Click on Linked Servers and choose New Linked Server… from the pop-up menu (as shown below)

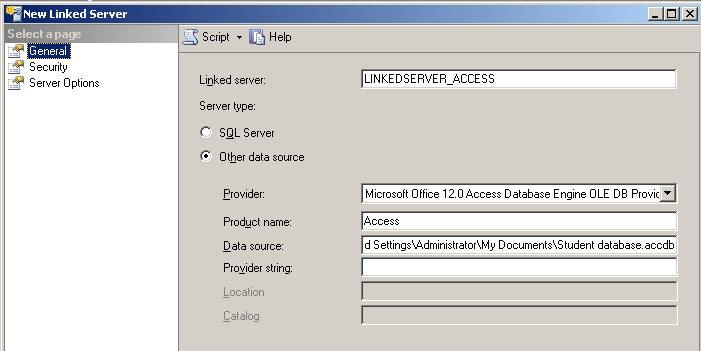
Then a dialog box is displayed, by default the General Page is displayed, where we can enter the name of the Linked Server that we are about to create in the Text box corresponding to Linked Server : In this example I am creating a Linked Server with name as SAMPLEMART_LINSVR.
Then, under Server type, choose Other data source option, (in the next blog we shall see when to choose SQL Server option) . From the drop down list corresponding to Provider, choose SQL Server Native Client 11.0.
Note: If you care creating a Linked Server to connect to another SQL Server in SQL Server 2008, then choose SQL Server Native Client 10.0, apart from that the rest everything is similar to what you see in this blog..
For Product name, enter SQLServer, for Data Source enter the name of the SQL Server Instance (the remote SQL Instance to which you want to connect), if the remote instance is a named instance, then enter the complete server name as machinename\instancename.

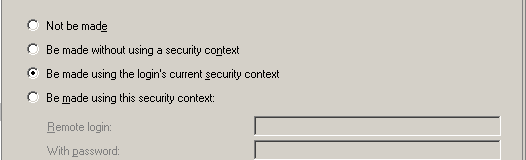
Next, select the Security page in the left side pane. Choose the last option Be made using this security context and enter the SQL Login Username and Password. This username with that password must exist on the remote server, prior to you using it here.

Next, select Server Options page. Choose appropriate value for the server options, in most cases the values are True or False which indicates whether the Linked Server being created should have that appropriate setting enabled or not. As an example, for Data Access, I selected True, indicating that we would like to access the data on the remote server using the Linked Server. If you would like to create a Linked Server now and do not want to access data using the Linked Server, you can choose False and then when the need arises to access data on the remote server, you can choose True.
Note that you can modify all of the options at a later time after the Linked Server is created. Once your selections are done, click OK to create the Linked Server.

If you do not see any error message, then your task of creating Linked Server was successful. You can find if it was created successfully by expanding the Linked Server node in Object Explorer and expanding the newly created Linked Server. You should be able to see the databases and also able to expand those databases and see the tables, etc (as shown below)

Querying data using a linked server
Now that we have created a linked server, we shall see how to query the data using the linked server. There are 2 ways we can query using a linked server; In this blog we are going to look at the easiest way to query a linked server.
Using 4 part Notation
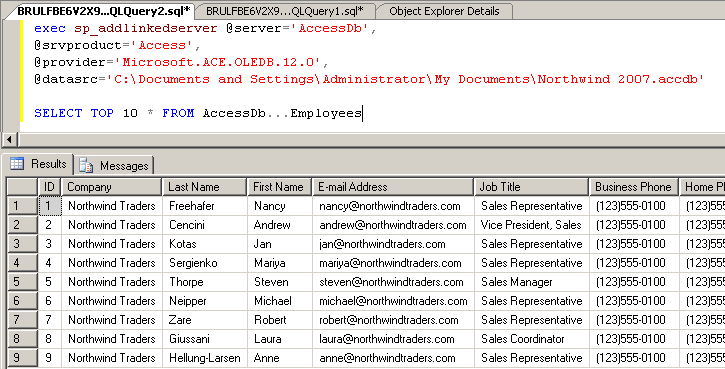
When querying a table using linked server, it is easier to query with a 4 part notation which is LinkedServer.Database.Schema.Objectname. In a normal queries we usually use a 2 part notation as schema.objectname such as dbo.Employee. While querying data using a linked server we would have to prefix LinkedServer.databasename to the 2 part notation. Hence in the below query, I am including the Linked Server name SAMPLEMART_LINSVR followed by the database name (SampleMartDW) followed by schema (dbo) and table name DimEmployeeDetails..

Though this way of querying a linked server is easier, the queries will be slower when compared to the other way of querying a Linked Server.
You can read the 2nd part of this blog here @ Create Linked Server to connect to a SQL Server Part – II.
Do you like this site? Like our FB page @ Facebook.com\LearnSQLWithBru so that, you know when there is a new blog post.
— Bru Medishetty