Create Linked Server to connect to a SQL Server Part – II

This blog is Part-II of last week’s blog post Create Linked Server to connect to a SQL Server Part – I. In this blog we shall learn two more ways of creating a Linked Server for a SQL Server destination.

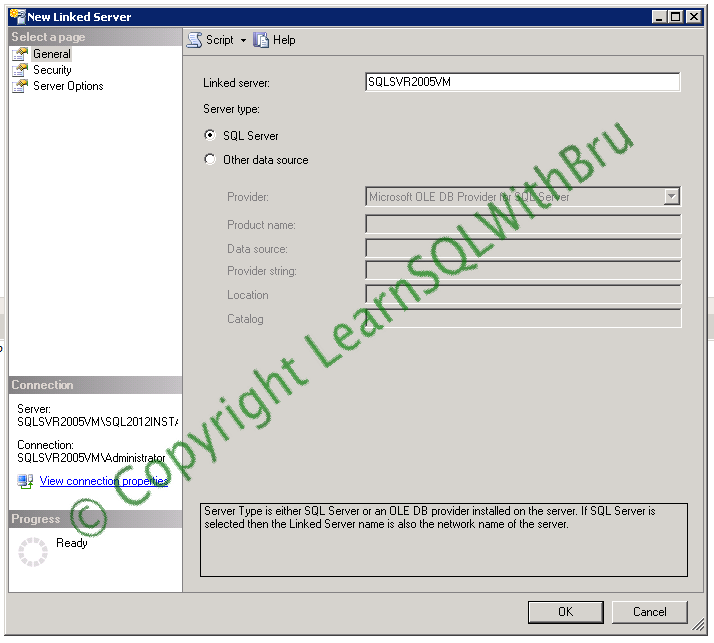
In the first part, we saw how to create a Linked Server using graphical interface from SSMS. In that method, we created linked server by selecting Other data source as Server type. In this method of creating Linked Server, we shall choose SQL Server as Server type and know more details about what is the difference when creating this way.

When creating Linked Server in this way, keep in mind that Linked Server name we are going to enter in the text box should be the same as the target SQL Server. If the target SQL instance is a named instance, you should be entering the full instance name as Servername\Instancename.

Security and Server Options in this method is same as as we saw in the first part of this  blog, so I am avoiding explanation of those steps in this blog. Once you are done, choose OK to create the Linked Server.

Using T-SQL

You can also create a Linked Server using system stored procedure sp_addlinkedserver. Below screen shot shows the script that I used to create a linked server using the system stored procedure sp_addlinkedserver. 

Do you like this site? Like our FB page @ Facebook.com\LearnSQLWithBru so that, you know when there is a new blog post.

–Bru Medishetty

Setting Database Compatibility Level for SQL Server 2012

In this blog we shall look at 2 ways to set a database to compatibility level for SQL Server 2012. The Compatibility level for SQL Server 2012 is 110.

Using graphical interface in SSMS

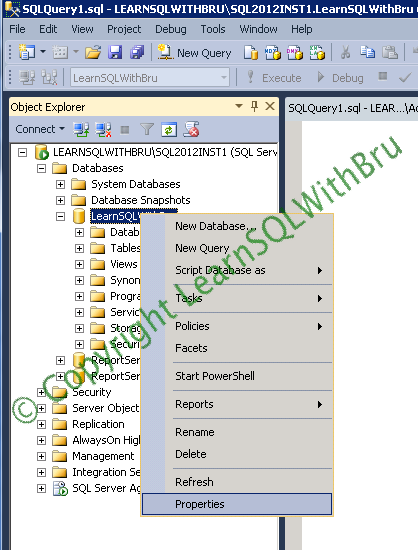
The first method we are going to learn is from SQL Server Management Studio. Connect to the target SQL Server, inside SSMS, expand the SQL Server in Object Explorer and expand the databases node. Right click on the Database for which you would like to change / set the compatibility level

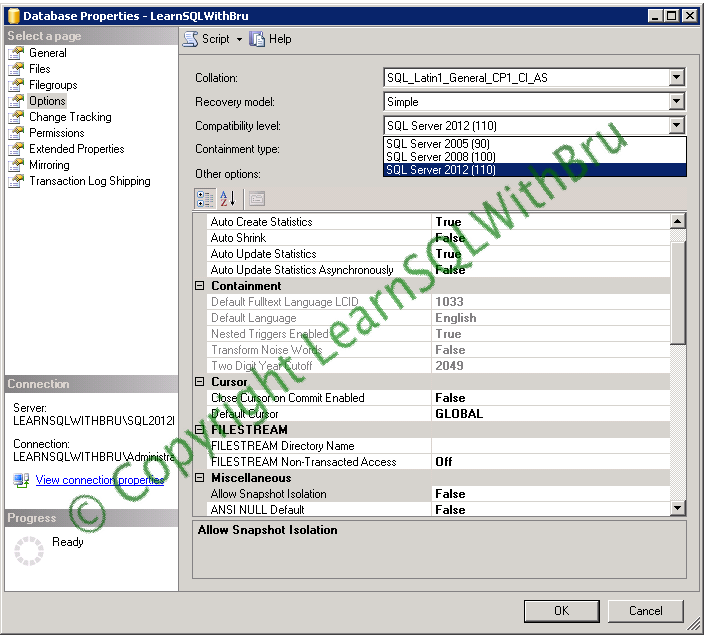
Once the database properties box is displayed, in the left side pane, select Options Page and the database options are displayed as shown below. Then in the right side of the properties box, there is a field Compatibility level (3rd from top), from the drop down list corresponding to Compatibility level choose SQL Server 2012 (110) and click OK button.Using T-SQL

Using T-SQL the same task can be achieved by running ALTER database command and Set the Compatibility_level property to 110 as shown in the below script. Remember to change the  database name with your database name.

ALTER DATABASE LearnSQLWithBru SET COMPATIBILITY_LEVEL = 110
GO

Once you have set the compatibility level, you can check if the changes have been applied by running the below script. Alternately you can check this by looking at the database properties (from object explorer).

SELECT NAME, COMPATIBILITY_LEVEL FROM SYS.DATABASES WHERE
NAME = 'LearnSQLWithBru'

Do you like this site? Like our FB page @ Facebook.com\LearnSQLWithBru so that, you know when there is a new blog post.

–Bru Medishetty
SQL Server Database Filegroup is Full; What, Why and How?

Last week a user asked my help on this error. After helping him, I thought it would be a good idea if I can post more detailed steps as a blog.

What is the issue?

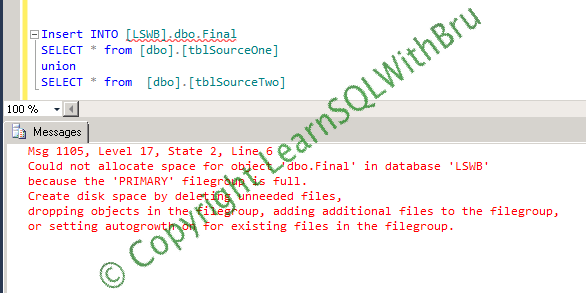
You receive an error message Could not allocate space for object dbo.final in database LSWB because the ‘PRIMARY’ filegroup is full. contd…..as shown in below pic. You see this error message if you are actively running a transaction from a query window in SSMS or you would see an entry in SQL Server Error Log. 

What this error means is, the filegroup mentioned in the error message is full and no more free space is available in the data file(s) of that filegroup. The database objects which need additional space to grow (to add new data) cannot grow causing failure to add new data or if new database object(s) are to be created, that cannot happen due to lack of  free space in the filegroup.

Why does this happen?

There might be multiple reasons that cause this problem. Some of them are..

  • Autogrowth is not enabled on the file(s) inside the filegroup.
  • Autogrowth is enabled on the data files but there is no free disk space to for the data files to grow.
  • Autogrowth is enabled on the data file but hit the Max growth size value.

How to solve this?

I order to solve this problem, there are few solutions and which one of the solutions can be applied depends on one or more factors on your SQL Server where this error has occurred.

  • If there is disk space available but the data files autogrowth is disabled, then enable autogrowth.
  • If there is disk space available and the data files autogrowth is enabled, change the Max file size value to a larger value.
  • If the data file can no longer grow due to no free disk space on that drive, then add another data file in that file group on a different drive.
  • If the data file can no longer grow due to no free disk space on that drive, and there are no additional drives to add a data file, then you have very few options left. You can try one of the following. 
    1. Delete / move any files (from windows explorer) which reside on that drive to get free space.
    2. Shrink any other databases that are residing on that drive, may be one of the data files.
    3. Drop one or more database objects that belong to the same filegroup.

Note: Pay attention when doing either of the last 3 steps, make sure that file(s) are not required (if deleting) or the database you shrink has sufficient free space in itself to survive until you get more oxygen (new storage attached to the server) or the table(s) or Indexes you drop in the same file group are not required any more…

Do you like this site? Like our FB page @ Facebook.com\LearnSQLWithBru so that, you know when there is a new blog post.

— Bru Medishetty